跳到主要内容

2 篇博文 含有标签「项目」

查看所有标签

Taro使用模块化开发,以提升开发效率

· 阅读需 17 分钟
duxapp
duxapp框架作者

duxapp是基于Taro二次开发的模块化框架

使用这个框架,结合框架提供的UI库和工具库,能帮助你快速且高质量的完成项目,且能实现同时开发小程序、H5、APP(React Native),并且保证各个端的一致性

duxapp还针对APP开发(React Native)做了大量优化,大大降低了APP发开的难度,你可以阅读React Native教程,了解详情

下面让我来详细介绍如何使用duxapp

何为模块化

什么是模块化?就像npm包一样,我们可以将一些通用的功能或页面编写在一个模块内,提供给多个项目来使用,以提高代码的复用性。

模块的概念在很多后端框架中很常见,它们可以在应用商店通过安装应用的方式来获得新功能,在前端框架中确很少见到类似的设计方案,当然你其实也可以理解为发布到npm就是一种模块化的设计,但是在Taro中很多功能他并不能发布到npm中,例如页面。页面需要放在项目中,当发布到npm之后就会无法使用

在duxapp框架中的模块化设计原理,和npm的依赖关系是类似的,每个模块有一个配置文件app.json,里面的依赖字段dependencies,用来填写我要用到的依赖,就像下面ui库示例这个模块的配置

{
"name": "duxuiExample",
"description": "ui库示例",
"version": "1.0.13",
"dependencies": [
"duxui",
"duxcms",
"amap",
"echarts",
"wechat"
]
}

和npm依赖不一样的是,这里的依赖不包含版本信息。因为页面等限制条件,你一个项目中,同一个模块无法存在两个不同的版本,因此并未设计指定版本号的功能

依赖关系是逐层查找的,就像npm一样,例如这里依赖的duxui模块,他的模块配置文件是这样的

{
"name": "duxui",
"description": "DUXUI库",
"version": "1.0.42",
"dependencies": [
"duxapp"
],
"npm": {
"dependencies": {
"b-validate": "^1.5.3",
"react-native-view-shot": "~3.8.0",
"react-native-fast-shadow": "~0.1.1",
"array-tree-filter": "^2.1.0"
}
}
}

在duxui模块中他又使用了duxapp这个依赖,通过每个模块都去查找,我们最终整理出这样的依赖关系图

dependencies

那么最终当我们使用下面的命令编译duxuiExample模块的时候

# 调试小程序
yarn dev:weapp --app=duxuiExample
# 调试h5
yarn dev:h5 --app=duxuiExample

实际被编译的模块就包含下面这些

  • duxuiExample
  • duxcms
  • amap
  • echarts
  • wechat
  • duxui
  • duxappReactNative
  • duxapp

使用duxapp

上面介绍了模块化的原理,现在我们来看看,具体要怎么使用这个框架

首先使用cli命令创建一个项目,中途会要求你选择模板,你可以选择 duxui 示例代码(包含所有组件的示例代码 支持RN端) 这个选项,和上面使用的示例一样

npx duxapp-cli create projectName

在使用这个命令之前,确保安装了以下工具和环境

安装后会自动安装项目依赖

进入项目目录projectName,使用上面提到的命令 yarn dev:weapp --app=duxuiExample 或者 yarn dev:h5 --app=duxuiExample 编译为小程序或者H5,使用开发者工具或者浏览器就能预览

可以看到编译命令是在Taro原有的命令基础上增加了 --app= 参数,参数用来指定一个模块,通常你都需要指定这个参数,因为你的项目中除了上面提到的模块之外,大多是时候还会存在其他模块,如果你不指定的话,他会把所有模块都打包进去

通过上面的描述可以看出,其实在一个项目中不是真的只有一个项目,在我的实际开发经验中,我是将很多项目放在一起开发的,我只需要通过 --app= 参数指定我的项目入口文件进行编译,他就是不同的项目

多个项目同时存在,如何保持他们不混乱呢,例如第三方npm依赖,每个项目可能都有不同的npm依赖,这通过下面的章节来介绍

模块

在duxapp框架中,src目录下每个文件夹将被识别为一个模块,模块一般是像下面这样设计结构的

├── duxapp                      模块名称
│ ├── components 模块组件库
│ │ ├── ComponentName 组件
│ │ │ └── index.jsx
│ │ └── index.js 导出需要导出的组件
│ ├── config 配置目录
│ │ ├── route.js 路由配置文件(路径固定)
│ │ ├── theme.js 主题配置文件(路径固定)
│ │ └── themeToScss.js 主题转换函数(路径固定)
│ ├── pages 页面放置文件夹
│ │ └── index 页面文件夹
│ │ ├── index.jsx 页面
│ │ └── index.scss
│ ├── utils 工具库
│ │ ├── index.js 导出工具库
│ │ └── ...you util.js
│ ├── update 模块安装目录
│ │ ├── copy 需要复制到项目的文件(路径固定)
│ │ │ └── ...
│ │ └── index.js 安装脚本 主要针对RN端 插件安装方法(路径固定)
│ ├── app.js 模块入口文件
│ ├── app.json 模块配置文件 包括名称 依赖等(必须)
│ ├── app.scss 全局样式文件(次样式文件无需导入到js文件中,会自动注入全局)
│ ├── changelog.md 更新日志(必须 如果发布)
│ ├── index.js 模块出口文件 可以导出组件和方法给其他模块使用
│ ├── index.html 如果是h5的项目可以自定义index.html,仅当作为入口模块时可用
│ ├── app.config.js 用于覆盖项目全局配置
│ ├── babel.config.js babel配置文件
│ ├── metro.config.js metro配置文件
│ ├── taro.config.js Taro编译配置文件
│ ├── taro.config.prod.js Taro 发布配置文件
│ ├── taro.config.dev.js Taro 调试配置文件
│ └── readme.md 自述文件(必须 如果发布)

关于模块目录的详细内容查看这个 模块结构 获取

模块配置

在duxui这个模块中,它的配置文件是这样的

{
"name": "duxui",
"description": "DUXUI库",
"version": "1.0.42",
"dependencies": [
"duxapp"
],
"npm": {
"dependencies": {
"b-validate": "^1.5.3",
"react-native-view-shot": "~3.8.0",
"react-native-fast-shadow": "~0.1.1",
"array-tree-filter": "^2.1.0"
}
}
}

我们看到,他有一个字段 npm,它的内容和项目的 package.json 的配置是完全一样的,在模块中编写这个内容,将会和项目的 package.json 进行覆盖合并,那么你就可以通过模块来安装当前模块需要依赖了,每个模块中都可以指定这个依赖,他们会合并在一起

当你指定了不同的 --app= 入口模块之后,框架会根据你使用到的模块中的第三方依赖自动重新安装

在模块中还有很多类似的设计,用来编写配置或者文件,包括下面这些

  • app.scss 编写全局样式
  • index.html 如果是h5的项目可以自定义index.html,仅当作为入口模块时可用
  • app.config.js 用于覆盖项目全局配置
  • babel.config.js babel配置文件
  • metro.config.js metro配置文件
  • taro.config.js Taro编译配置文件

模块路由

每个模块中都可以编写页面,当然这不是必选项,这些页面会被定义在自己的模块中

通过 modeName/config/route.js 定义当前的模块路由,例如 duxuiExample 的路由定义如下

/**
* login:是否需要登录
* platform:支持的平台(weapp, h5, rn)不配置支持所有
* subPackage:是否将其设置为分包
* home: 是否是主页 是主页的页面将会被排在前面
*/
const config = {
pages: {
'duxuiExample/index': {
pages: {
index: {
home: true
}
}
},
'duxuiExample/example': {
pages: {
Button: {},
Cell: {},
Grid: {},
Divider: {},
Space: {},
// 更多未展示
}
}
}
}

module.exports = config

路由的定义也是经过封装的,配置的时候是将一个文件夹作为一个对象来处理,这样我们能很方便的将某个文件夹进行分包等操作

使用UI库和全局样式编写页面

在基础模块 duxapp 中提供了可以用于快速布局页面的全局样式,他就和 tailwindcss 类似,在结合UI组件,编写页面像下面这样的,可以看到我们不需要编写 scss 文件就能完成页面的编写

import { Avatar, Card, ScrollView, Column, Divider, Header, Text, TopView, Row, px, Image, nav, Tag } from '@/duxui'
import { useRequest, CmsIcon, saleHook, Qrcode } from '@/duxcmsSale'
import { setClipboardData } from '@tarojs/taro'

export default function Sale() {

const [{ info = {}, day = {}, money, total = {} }] = useRequest('sale/index')

return <TopView>
<Header absolute title='推广中心' color='#FFFFFF' style={{ backgroundColor: 'transparent' }} />
<Image style={{ height: px(396) }} className='w-full absolute' src={require('./images/tui_bag.png')} />
<Row justify='between' items='center' style={{ marginTop: px(208) }} className='mt-3 ph-3'>
<Row items='center' justify='start'>
<Avatar url={info.avatar}>{info.nickname}</Avatar>
<Column className='mh-3'>
<Row items='center' className='gap-2'>
<Text size={33} bold color='#FFFFFF' >{info.nickname}</Text>
{!!info.level_name && <Tag type='primary' size='s'>{info.level_name}</Tag>}
</Row>
<Row className='mt-2'>
<Text color='#FFFFFF' size={1}>邀请码:{info.code}</Text>
<CmsIcon className='mh-2' size={36} name='copy' color='#FFFFFF' onClick={() => setClipboardData({ data: info.code })} />
</Row>
</Column>
</Row>
<CmsIcon size={60} name='QRcode1' color='#FFFFFF' onClick={Qrcode.show} />
</Row>
<ScrollView className='mt-3'>
<Card margin disableMarginTop>
<Row jtems='center' justify='between' className='gap-3'>
<Column justify='center' items='center' grow >
<Text bold type='primary'>{total.order_num || 0}</Text>
<Text color={2} size={2} className='mt-2'>直推订单</Text>
</Column>
<Column justify='center' items='center' grow>
<Text bold type='primary'>{total.user_num || 0}</Text>
<Text color={2} size={2} className='mt-2'>直推客户</Text>
</Column>
</Row>
<Row className='mt-2' jtems='center' justify='between'>
<Column justify='center' items='center' grow>
<Text bold type='primary'>{total.month_sale_money || 0}</Text>
<Text color={2} size={2} className='mt-2'>本月收益</Text>
</Column>
<Column justify='center' items='center' grow>
<Text bold type='primary'>{total.sale_money || 0}</Text>
<Text color={2} size={2} className='mt-2'>累计收益</Text>
</Column>
</Row>
</Card>
<Card shadow margin disableMarginTop onClick={() => nav('duxcmsAccount/cash/index')}>
<Row items='center' justify='between'>
<Text bold>佣金管理</Text>
<CmsIcon name='direction_right' size={32} />
</Row>
<Row className='mt-3' items='baseline'>
<Text size={2}>可提现佣金:</Text>
<Text className='mh-3' bold size={50}>{money || 0}</Text>
</Row>
</Card>
<Card margin disableMarginTop>
<Row items='center' justify='around'>
<Column items='center'>
<Text size={2}>今日预估收益</Text>
<Text className='mt-1' bold size={40} >{day.sale_money || 0}</Text>
</Column>
<Column items='center'>
<Text size={2}>今日有效订单</Text>
<Text className='mt-1' bold size={40} >{day.order_num || 0}</Text>
</Column>
<Column items='center'>
<Text size={2}>今日新增客户</Text>
<Text className='mt-1' bold size={40} >{day.user_num || 0}</Text>
</Column>
</Row>
</Card>

<Card margin className='gap-4'>
<Text size={4} bold>其他操作</Text>
<Row justify='between' items='center' onClick={() => nav('duxcmsSale/index/order')}>
<Text size={2} className='mh-2' bold>推广订单</Text>
<CmsIcon name='direction_right' size={32} />
</Row>
<Row justify='between' items='center' onClick={() => nav('duxcmsSale/index/customer')} >
<Text size={2} className='mh-2' bold>我的客户</Text>
<CmsIcon name='direction_right' size={32} />
</Row>
<saleHook.Render mark='index.menus' />
</Card>
<Row style={{ height: px(16) }}></Row>
</ScrollView >
</TopView>
}

为何获得更好的编辑体验,需要在vscode中安装 SCSS Everywhere 插件,他能识别到全局样式并给出编写提示

用户配置

很多模块都是通用的,那么一些需要根据不同项目变化的内容,就不能写在模块中,而是要通过配置的形式来配置

项目配置放在项目根目录下的 configs 目录中,其中每个文件夹就是一个配置,文件中的index.js就是项目配置

像下面这个duxuiExample的配置,其中option中的每一项就是对应模块的配置

// import qiniu from './base/components/UploadFileManage/drive/qiniu'

const config = {
// 覆盖app.config.js 配置
appConfig: {
requiredPrivateInfos: [
'chooseLocation',
'getLocation',
'onLocationChange',
'startLocationUpdateBackground',
'chooseAddress'
]
},
// 调试配置
debug: {
// 在h5端开启vconsole调试功能
vconsole: false
},
// 模块配置 将会调用模块生命周期的option,将对应模块的参数传入
option: {
// 基础模块
duxapp: {
theme: {
primaryColor: '#E70012',
secondaryColor: '#E84C00',
successColor: '#34a853',
warningColor: '#fbbc05',
dangerColor: '#ea4335',
pageColor: '#F7F9FC',

textColor1: '#373D52',
textColor2: '#73778E',
textColor3: '#A1A6B6',
textColor4: '#FFF',
header: {
color: '#fff', // 仅支持rgb hex值,请勿使用纯单词 设置为数组将显示一个渐变按钮
textColor: '#000', // 文本颜色
showWechat: false, // 微信公众号是否显示header
showWap: true, // h5是否显示header
}
}
},
codepush: {
androidKey: '',
iosKey: '',
},
wechat: {
// 分享组件配置
share: {
open: true,
// 开启未定义的页面分享
pageSlef: {
// 包含这些页面分享自身 页面路径关键词匹配 include 优先级比 exclude 高,
// 可以配置exclude为空数组表示支持所有页面
// pageSlef优先级高于pageHome
// include: ['page/test'],
// 排除这些页面 不进行分享
exclude: []
},
// 开启未定义的页面分享到指定页面
pageHome: {
path: '',
params: {},
// 包含这些页面分享自身 页面路径关键词匹配
// include: [],
// 排除这些页面 不进行分享
// exclude: []
},
// 公共分享参数
common: {
title: 'DUXUI',
desc: '同时兼容小程序、H5、RN',
image: 'https://img.zhenxinhuixuan.com/weiwait/cropper/2lVCofRIu6Jl3jNebxCA6VkEMUeaobvLWFYMTiaG.jpg'
},
platform: {
app: {
// 配置分享到小程序的原始id 同时相当于开关
weappUserName: '',
// 配置分享到h5的url 同时相当于开关
h5Url: 'https://duxui.cn',
}
}
}
},
// 新php模块化系统
duxcms: {
request: {
origin: 'https://mock.dux.plus',
path: 'api', // 域名二级目录
secretId: '53368068',
secretKey: '6c278fbf1791fbed3ae79197de03f65f',
devOpen: false,
devToken: 'eyJ0eXAiOiJKV1QiLCJhbGciOiJIUzI1NiJ9.eyJzdWIiOiJtZW1iZXIiLCJpYXQiOjE2ODc5Mzg3NDEsImV4cCI6MTY5MDUzMDc0MSwiaWQiOjZ9.kCb82Y3bgUJWUo_WYsUPO1cLYzF1OJdEWTKAj9iNlF0'
},
// 登录相关配置
loginConfig: {
// 手机号登录
phone: true,
// 邮箱登录
email: false,
// app微信登录
appWatch: true,
// 小程序微信登录
weappWatch: true,
// 名称
appName: 'duxui'
}
}
}
}

export default config

后端框架

在我开发的项目中,后端框架是我的合伙人负责的,后端同样也是采用模块化的开发模式完成的,duxapp框架对后端框架已经打好了对接的基础,如果你考虑进一步提升后端的开发效率,可以考虑使用

后端开发文档:https://www.dux.cn/

总结

这一篇文章已经很长了,duxapp框架中还有很多内容,无法在这里一一介绍,像下面这些

  • 模块主题
  • 模块安装与发布
  • 快速开发APP(React Native)
  • 请求上传
  • 路由系统
  • 开放模块(用户管理、微信、支付宝、页面设计器等)
  • 等等

请前往开发文档查看详细教程

开发文档:http://duxapp.cn/

GitHub:https://github.com/duxapp

用duxapp快速完成项目

· 阅读需 10 分钟
duxapp
duxapp框架作者

使用duxapp,我是如何实现快速完成项目开发的?

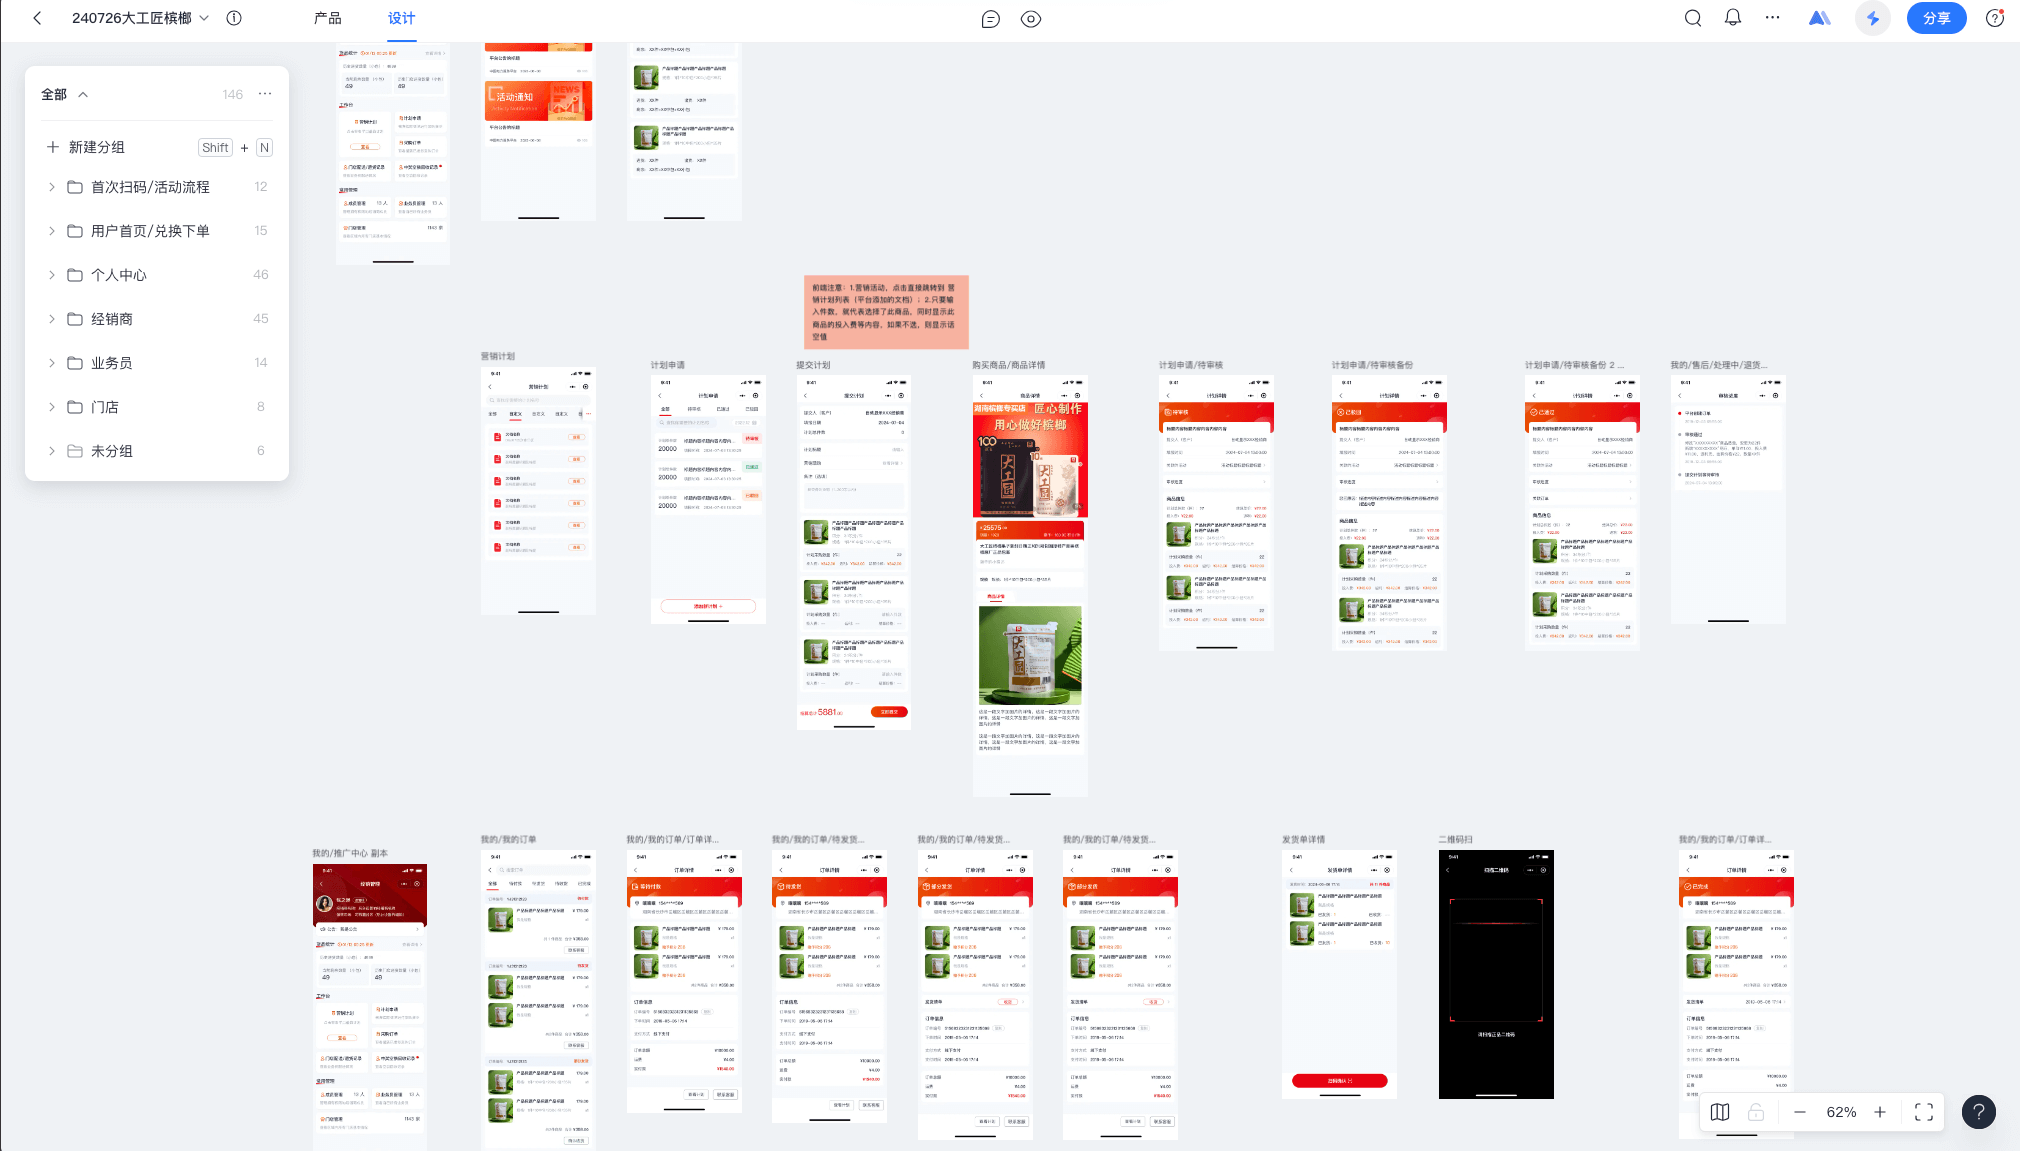
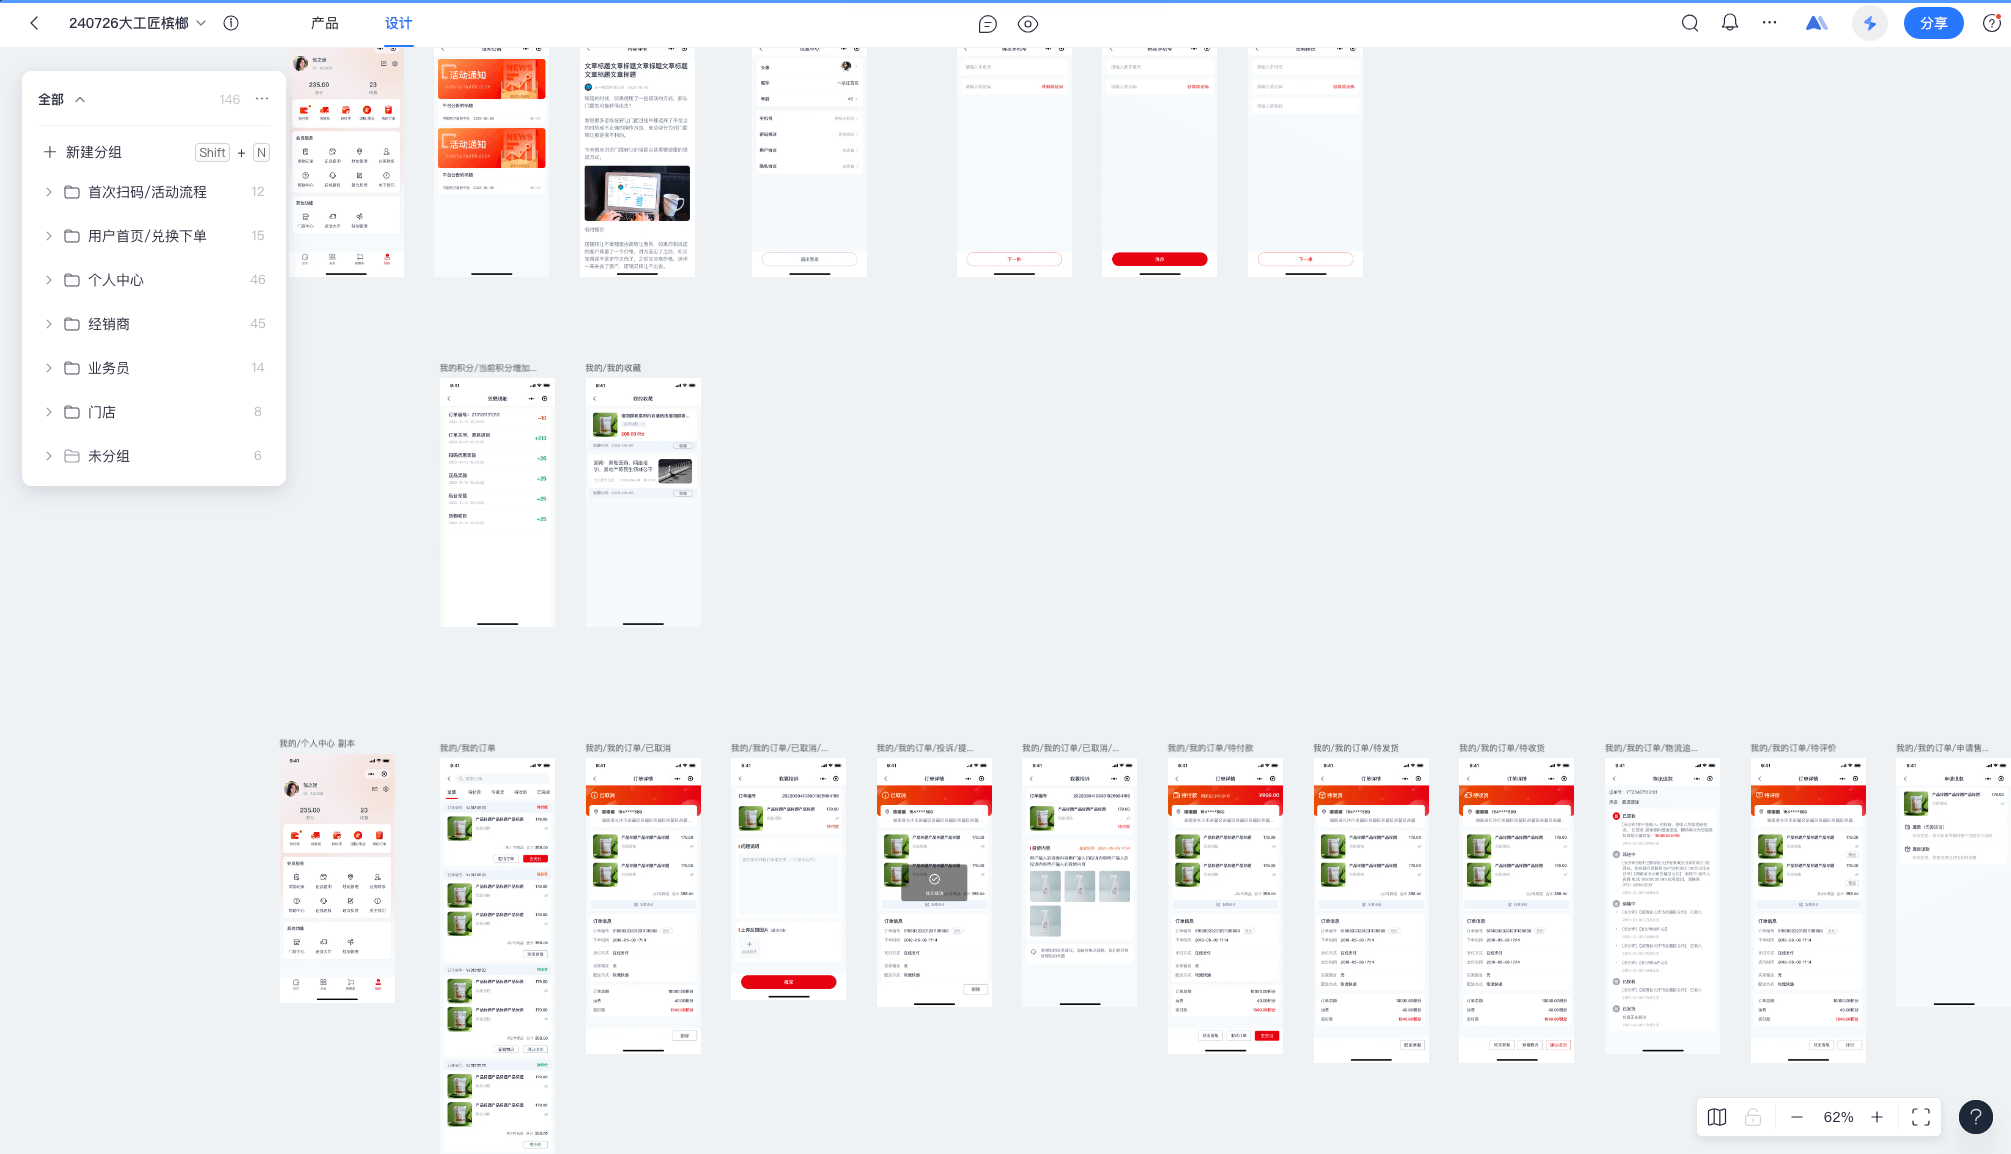
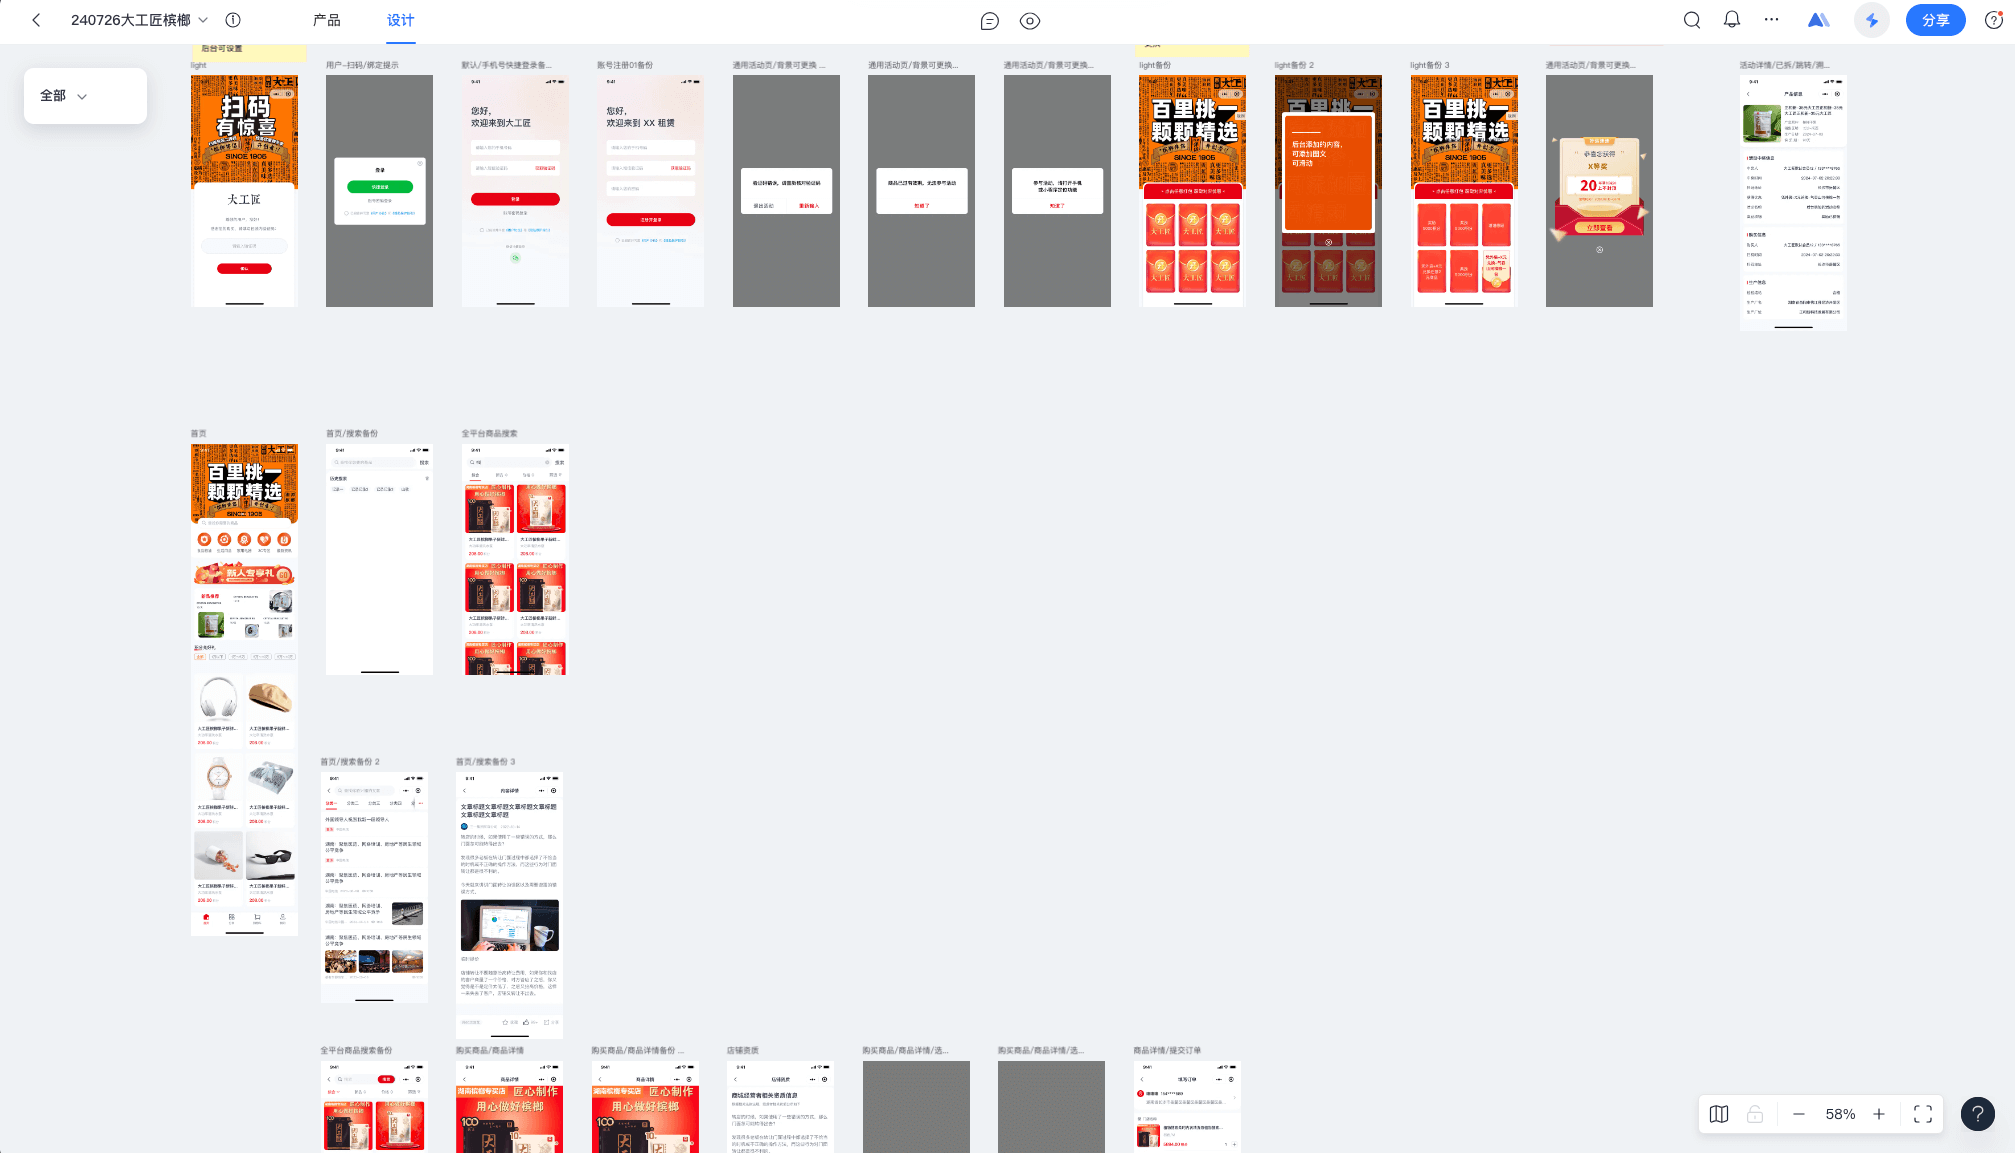
像下面这个例子,这个项目有140多个页面,但是真实的开发时间,在熟练使用duxapp的情况下,不会超过两周,并且可以将它兼容APP、小程序、H5

p1 p2 p3

这里仅展示了其中一部分页面,这个项目主要包含下这些功能

  • 购物订单流程
  • 售后退换
  • 文章发布
  • 门店功能
  • 送货人员功能
  • 经销商功能
  • 扫码抽奖
  • 等其他功能

下面我将详细介绍使用了哪些方法,来快速完成项目

使用全局样式快速布局页面

以这个门店管理首页为例,你可以看到我并没有导入一个scss文件,但是我使用了很多的className,这些就是用的全局样式,这全局样式都是duxapp模块提供的

import { TopView, Header, Card, Divider, ScrollView, Tag, Row, Image, Column, Text, px, nav, ModalForm, DatePicker, dayjs } from '@/duxui'
import { ArecaIcon, CmsIcon, TipNav, useRequest } from '@/arecaShop'
import { useState } from 'react'

export default function StoreManage() {

const [date, setDate] = useState()

const [{ info = {}, sku = {}, distribution = {} }] = useRequest({
url: 'store/index',
toast: true,
data: {
date
}
}, { reloadForShow: true })

return (
<TopView>
<Header title='门店详情' />
<ScrollView>
<Card className='p-2 gap-2' margin disableMarginBottom>
<Row className='gap-2'>
<Image className='r-2'
src={info.image}
style={{ width: px(148) }}
square
/>
<Column justify='between' grow>
<Row justify='between' grow>
<Text bold size={4}>{info.name}</Text>
<ArecaIcon name='shezhi' className='text-c1 text-s7'
onClick={() => nav('arecaShop/storeManage/info')}
/>
</Row>
<Column>
<Text color={2} size={1}>联系人:{info.contact}</Text>
<Row grow justify='between' items='center'>
<Text color={2} size={1}></Text>
<Tag type='secondary' size='s' radiusType='round' onClick={() => nav(`tel:${info.distributor_tel}`)}>
<ArecaIcon className='text-white text-s2' name='shiwu-shouji' /> 一键报单进货
</Tag>
</Row>
</Column>
</Column>
</Row>
<Divider />
<Row>
<Text color={2} size={1} shrink>门店地址:</Text>
<Text bold size={1}>{info.area}{info.address}</Text>
</Row>
</Card>
<TipNav title='货品统计' url='arecaShop/storeManage/mallTotal'>
<Row className='items-center' grow>
<ArecaIcon className='text-secondary' name='promot_tips' />
<Text type='secondary' size={2}>{dayjs().format('MM/DD HH:mm')} 更新</Text>
</Row>
</TipNav>
<Card margin disableMarginBottom className='gap-2'>
<Text color={3} size={2}>历史进货数量(小包):{sku.in}</Text>

<Row justify='between' className='gap-2'>
<Column grow className='bg-page r-2 p-3 gap-1'>
<Text color={3} size={2}>历史销售数量(小包)</Text>
<Text bold size={40}>{sku.out}</Text>
</Column>
<Column grow className='bg-page r-2 p-3 gap-1'>
<Text color={3} size={2}>历史剩余数量(小包)</Text>
<Text bold size={40}>{sku.supply}</Text>
</Column>
</Row>
<Text size={22} type='secondary'>*销量及剩余仅供参考:记录消费者扫码数量,可能与实际结果有出入</Text>
</Card>
<TipNav title='配送记录'
right={<ModalForm
title='月份'
renderForm={<DatePicker
mode='month'
/>}
childPropsValueKey='value'
value={date}
onChange={setDate}
>
<DateChild />
</ModalForm>}
></TipNav>
<Card margin disableMarginBottom className='gap-2'>
<Text color={3} size={2}>门店配送(中包):{distribution.middle_num}</Text>

<Row justify='between' className='gap-2'>
<Column grow className='bg-page r-2 p-3 gap-1'
onClick={() => nav('arecaShop/storeManage/emptyRecovery', { type: 'store' })}
>
<Text color={3} size={2}>已结算空袋(小包)</Text>
<Row items='center' className='gap-1'>
<Text bold size={40}>{distribution.recycle_num}</Text>
<CmsIcon className='text-c3 text-s5' name='direction_right' />
</Row>
</Column>
<Column grow className='bg-page r-2 p-3 gap-1'
onClick={() => nav('arecaShop/storeManage/deliveryList')}
>
<Text color={3} size={2}>门店已退货数(小包)</Text>
<Row items='center' className='gap-1'>
<Text bold size={40}>{distribution.refund_num}</Text>
<CmsIcon className='text-c3 text-s5' name='direction_right' />
</Row>
</Column>
</Row>
</Card>
</ScrollView>
</TopView>

)
}

const DateChild = ({ value, onClick }) => {
return <Row items='center' className='r-2 ph-2 bg-white gap-1' onClick={onClick}>
<Text color={value ? 1 : 3}>{value || '请选择'}</Text>
<ArecaIcon name='rili1' className='text-c3' />
</Row>
}

使用UI库

在上面的示例中已经展示了如何使用UI库的组件,可以看到使用了UI库的组件,在结合全局样式,你会发现,似乎不需要编写scss就能很好的完成页面布局了

这些组件都是duxui UI库提供的

使用List组件完成列表页面

以下面这个列表页面为例,List组件帮你完成了数据请求、自动分页、下拉刷新、自动刷新等功能,你只需要关注你列表中的每一项是如何编写的

import { TopView, Header, Card, Tab, Row, Image, Column, Text, px, Empty, DatePicker, SelectorPicker, ModalForm, Button } from '@/duxui'
import { ArecaIcon, List, usePageData, nav } from '@/arecaShop'
import { useState } from 'react'

export default function DeliveryList() {

const [users] = usePageData('store/salesman')

const [user, setUser] = useState()

const [type, setType] = useState(0)

return (
<TopView>
<Header title='配送记录' />
<Tab className='bg-white' value={type} onChange={setType}>
<Tab.Item title='门店配送' paneKey={0} />
<Tab.Item title='门店退货' paneKey={1} />
</Tab>
<Row className='ph-3 mt-3' items='center' justify='between'>

<ModalForm
title='业务员'
renderForm={<SelectorPicker range={users} nameKey='nickname' valueKey='id' />}
childPropsValueKey='value'
value={user}
onChange={setUser}
>
<SelectChild />
</ModalForm>

</Row>

<List
key={type}
renderItem={Item}
renderEmpty={<Empty title='暂无记录' />}
url={type ? 'store/refund' : 'store/distribution'}
data={{
salesman_id: user
}}
/>
</TopView>
)
}

const SelectChild = ({ value, ...props }) => {

return (
<Row items='center' {...props}>
<Text size={2}>{value || '全部业务员'}</Text>
<ArecaIcon name='arrow_down_fill' className='text-s4 text-c2' />
</Row >
)
}

const Item = ({ item }) => {
return <Card margin disableMarginBottom className='gap-3'>
<Row items='center'>
<ArecaIcon className='text-c1 text-s7' name='store' />
<Text size={2} style={{ marginLeft: px(4) }}>{item.store_name}</Text>
<ArecaIcon className='text-c3 text-s5' name='you2' />
</Row>
{
item.goods.map(good => <Row className='gap-3' key={good.id}>
<Image style={{ width: px(160) }} square className='r-2' src={good.image} />
<Column grow justify='between'>
<Text size={2} bold numberOfLines={2}>{good.title}</Text>
<Text size={2} color={3}>规格:{good.spec}</Text>
<Text size={2} color={3}>数量:{good.num}</Text>
</Column>
</Row>)
}

<Column className='r-2 bg-page p-3 gap-2'>
<Row>
<Row grow items='center'>
<ArecaIcon className='text-secondary text-s7' name='man_mine' />
<Text size={2}>{item.salesman_name || '-'}</Text>
</Row>
<Row grow items='center'>
<ArecaIcon className='text-secondary text-s7' name='shiwu-shouji' />
<Text size={2}>{item.salesman_tel || '-'}</Text>
</Row>
</Row>
<Row>
<Row grow items='center'>
<ArecaIcon className='text-secondary text-s7' name='map' />
<Text size={2}>{item.area}</Text>
</Row>
<Row grow items='center'>
<ArecaIcon className='text-secondary text-s7' name='shijian1' />
<Text size={2}>{item.created_at}</Text>
</Row>
</Row>
</Column>
</Card>
}

使用hook快速请求数据

这里是指的使用useRequest替代request快速获取数据,而不需要在编写具体请求逻辑

import { TopView, Header, Card, Text, ScrollView, Space, HtmlView, useRoute } from '@/duxui'
import { useRequest } from '@/arecaShop'

export default function HelpDetail() {

const { params } = useRoute()

const [detail] = useRequest(`tools/magic/help/${params.id}`)

return (
<TopView isSafe>
<Header title='帮助详情' />
<ScrollView >
<Card shadow={false} margin>
<Space size={32}>
<Text bold size={42} >{detail.title}</Text>
<HtmlView html={detail.content} />
</Space>
</Card>
</ScrollView>
</TopView>
)
}

使用现有模块

这个项目中的 购物订单流程、售后退换、文章发布等功能,在之前的模块中都已经是开发过的功能,并且他们都是成熟可用的,我们只需要直接使用他们就行了

{
"name": "arecaShop",
"description": "大工匠槟榔商城",
"version": "1.0.0",
"dependencies": [
"duxcmsMall",
"amap"
]
}

在我这个项目模块的配置文件中,将 duxcmsMall 添加到依赖中,这是商城模块他提供了商品、订单、售后、购物车、收货地址等功能

因为当前项目需求是积分兑换商品,但是默认的商城不支持积分功能,下面介绍是使用渲染钩子来修改为积分商品

使用渲染钩子对商城进行修改

使用RenderHook,将商城购物流程修改为积分兑换流程,这个文件需要在模块入口文件中导入

import { mallHook, orderHook, Price } from '@/duxcmsMall'
import { Card, contextState, Row, Text } from '@/duxui'

const ListPrice = ({ item, children }) => {
if (item.type === 'point') {
return <Text bold size={4} type='danger'>{item.sell_point}积分</Text>
}
return children
}

mallHook.add('goods.list.item.sellPrice', ListPrice)
mallHook.add('MallCateQuick.item.sellPrice', ListPrice)
mallHook.add('MallList.item.sellPrice', ListPrice)

mallHook.add('detail.info.price', ({ children }) => {

const [data] = contextState.useState()

if (data.type !== 'point') {
return children
}

return <Row className='gap-2' items='center'>
<Text size={40} bold color={4}>
{data.sell_point}积分
</Text>
<Price size={1} delete color={4} className='mt-2'>{data.market_price}</Price>
</Row>
})

mallHook.add('GoodsSpec.price', ({ children, data, item }) => {
if (data.type !== 'point') {
return children
}
return <Text size={48} bold type='danger'>
{item?.sell_point || data.sell_point}积分
</Text>
})

orderHook.add('order.create.data.total', ({ store }) => {

// const isPoint = store.items.some(v => v.type === 'point')

return <>
<Row items='center' justify='between'>
<Text bold>商品金额</Text>
<Price color={2}>{store.total.order_price}</Price>
</Row>
<Row items='center' justify='between'>
<Text bold>运费</Text>
<Price color={2}>{store.total.delivery_price}</Price>
</Row>
{
store.discount.map(item => <Row key={item.name} items='center' justify='between'>
<Text bold>{item.desc}</Text>
<Text type='danger'>{item.price}</Text>
</Row>)
}
{/* {+store.total.discount_price > 0 && <Row items='center' justify='between'>
<Text bold>{isPoint ? '积分抵扣' : '优惠'}</Text>
<Price type='danger'>{-store.total.discount_price}</Price>
</Row>} */}
</>
})

orderHook.add('order.detail.total', () => {
const [{ data }] = contextState.useState()

return <Card margin disableMarginBottom className='gap-3'>
<Row items='center' justify='between'>
<Text color={2}>订单总额</Text>
<Price bold color={1}>{data.order_price}</Price>
</Row>
<Row items='center' justify='between'>
<Text color={2}>运费</Text>
<Price bold color={1}>{data.delivery_price}</Price>
</Row>
{
data.discount_data?.map(item => <Row key={item.name} items='center' justify='between'>
<Text color={2}>{item.desc}</Text>
<Text bold type='danger'>{item.price}</Text>
</Row>)
}
<Row items='center' justify='between'>
<Text color={2}>实付款</Text>
<Price bold type='primary'>{data.pay_price}</Price>
</Row>
</Card>
})

总结

上面提到的就是用于快速开发的主要方法,当你熟练掌握这些方法后,你的开发速度将一骑绝尘

当然这些上面提到这些并不是全部,你可以阅读开发文档,从中获取更多的使用方法